How to install plug-in filters in Photoshop
Among the most popular questions asked by newbies about Photoshop compatible plugins are:
Where do I install a plugin and how do I load it afterwards?
A plugin (or plug-in) is a computer program that integrates into another program adding new features and increasing functionality. Adobe lets you install plug-in filters from other software developers in its programs.
Some Photoshop compatible plugins have an installer that will guide you through the process. But what should you do if plug-ins are not added in Photoshop? How to install these files? It's as easy as pie. All you need to do is to copy (or drag) the file into the Plug-Ins folder of Adobe Photoshop.
The Adobe folder is typically located in Program Files on Windows and in Applications on Mac computers. If you have installed Photoshop in any other location you should look for the Plug-Ins folder there.
See also:
Useful Tips on Installing Plugins (below),
Installation Troubleshooting Guide for Windows 32 bit,
Photoshop PlugIns in Windows 64 bit.
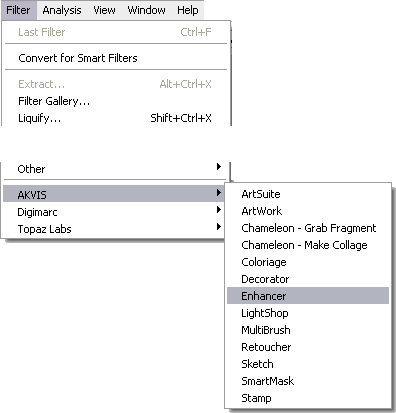
Bear in mind that Photoshop must be closed when installing new plugins. Or you will need to restart the editor. Next time you run Photoshop, the plugins will be available in the Filter menu.

Call Plugins in Photoshop: Filter -> AKVIS -> Enhancer
Some Useful Tips:
- Photoshop recognizes plug-ins located in subfolders and subdirectories inside the Plug-Ins folder.
You can classify your filters by developer or by task. Just create a new folder inside the Plug-Ins folder and put the files in it.
However, the list of plugins in the Photoshop menu (under Filter) looks different from the list in the Plug-Ins folder. In the Photoshop menu plug-ins are usually classified by developer.
- Photoshop also recognizes shortcuts (Windows) and alias (Mac OS) within the Plug-Ins folder and subfolders.
Install your plug-in filters into any folder outside Photoshop, and then create a shortcut for the ".8bf" file (or "make alias" on Mac) and place it into the Plug-Ins folder.
With shortcuts you can manage your plugins quickly and safely.
- You can select an additional plug-ins folder in Photoshop Preferences.
Call the command Edit on Windows or Photoshop on Mac, then -> Preferences -> Plug-ins & Scratch Disk.
Select Additional Plug-ins Folder, then use the button Choose to select a folder or directory from the list.
Attention!
If you select the Additional Plug-ins Folder in Photoshop 32 bit, make sure that the folder does not contain the 64 bit files (64-bit version of the plugin), otherwise you will get an error message!
Note:
Some filters show up directly in the main Photoshop menu (typically between "Windows" and "Help" titles).
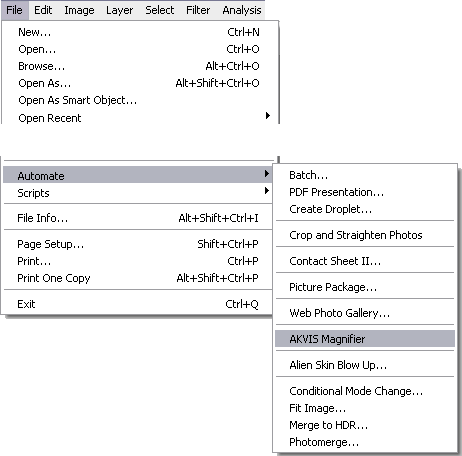
Some plugins (which change size of images) appear in the menu Automate, for example, the Magnifier plugin: File -> Automate -> AKVIS Magnifier.

Call Automation Plugins: File -> Automate -> AKVIS Magnifier
