Installing Plug-ins in PhotoImpact
One of the most common questions asked by users is how to install plugins in Photoimpact. One complaints, for instance, "I have installed your plugins but they do not appear in the Effect submenu of Photoimpact".
In this tutorial we'd like to show you how to install plug-ins into Photoimpact and explain what additional steps one should take if the plug-ins do not show up. Some plugins have a setup file, others are distributed as ".8bf" files (*.8bf is a common ending for plug-ins in Windows).
How to install a plugin?
If the plug-in has an installer, then just double-click on the setup-file and follow the instructions. It will usually ask you to select the Plug-ins folder of your photo editor. Usually it is the folder C:\Program Files\Corel\PhotoImpact X3\plugin\.
Next time you launch PhotoImpact, you will see the plug-ins under the Effect submenu. See an example of Installation using a setup file.
What to do if the plug-in won't appear under Effect?
Even if you correctly installed your plug-in, it may happen that it won't appear in the submenu. The reason is that PhotoImpact does not recognise this folder as a Plugin folder and does not load plug-ins from it. In this case follow the instruction:
Method 1. You can just copy the 8bf file to the image editor plugins' folder.
For example, to install the AKVIS Sketch plugin to PhotoImpact X3, copy Sketch.8bf from C:\Program Files\AKVIS\Sketch to C:\Program Files\Corel\PhotoImpact X3\plugin\.
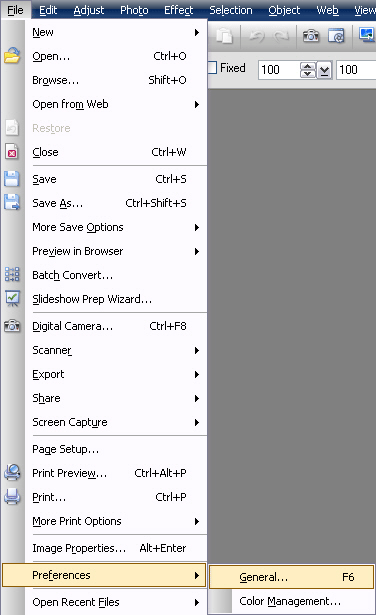
Method 2. In PhotoImpact call the command File =>Preferences => General.

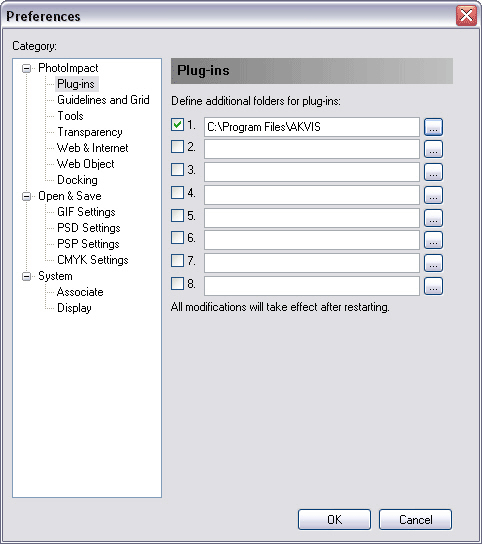
In the following dialog box select Plug-ins from the list. Then click on the button
 on the right and browse to find the Plugin folder. Below we added the folder C:\Program Files\AKVIS\ as the Plugin folder.

Press OK and re-start PhotoImpact. Go to the menu Effect to look for the installed plug-ins.
Here you can find some Photoimpact compatible plug-ins.
